This post contains affiliate links.
I decided to purchase a 12 Tonne Hydraulic Press for the Garage.
One of the things you will need to do from time to time if you’re an amateur mechanic, professional home mechanic, or a weekend warrior is replace bearings. If you’re lucky, you will get a bearing that’s a simple unbolt and slide-on replacement type. If not, you will need to press it in and push out the old one.
The DIY lazy man way involves smacking it with a hammer/socket or using a vice, which can damage it. The bearings need straight downwards pressure.
As I like to maintain my own car myself, I decided it would be beneficial to purchase a Hydraulic Press for the garage, because it’s a tool which is universal and can be applied to any car I work with or own. This means when I want to push in any bushes, bearings or remove old ones I had the equipment at hand to do it
The actual press only cost me £100, sure it’s not perfect, and has it’s flaws, but for the price I can’t complain, as I don’t expect to use it constantly. It’s just one of those tools to add to my garage.
Here’s my honest thoughts of the product since purchasing it, with the pro’s and cons of it.
THE GOOD
The price on it, it’s well constructed in terms of material. It was well packaged and arrived quickly, all the nuts and bolts were there to assemble it and all the parts. Which is always a good start
THE BAD
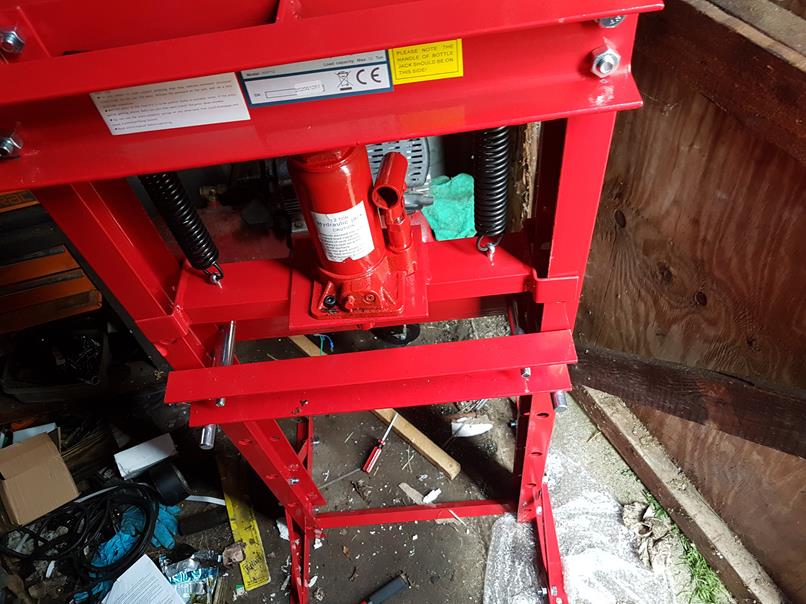
Now, the things I don’t like about this. First thing, the “manual”, if you can call it that. Basically it’s just an A4 piece of paper with some information printed on it, and a VERY poor low quality picture. Not really useful when you’re trying to identify the parts you want. When you look at them logically though, it’s actually quite easy to figure out. In brief here they are below to save you time looking at the instructions
- M12 x 30mm bolt
- The majority of the kit contains these. Basically almost every thing you assemble uses the same 4 parts. An M12 x 30mm bolt, a lock washer, a normal washer and an M12 nut. If you spend the time putting all these together ready. It will save you time during assemble. One point to be careful of though, which I found out later. Apparently there’s 4 bolts which are a different strength class (used to support the main top press that the bottle jack pushes against). The strength class is stamped on the heads of the bolts “4.8”, the stronger ones will have a higher numberon them (e.g “9.6”), keep these four to one side
- M12 x 120mm bolt
- There’s only two of these bolts. Basically you only use these bolts with the empty steel tubes. A lock washer, washer and M12 nut. This bolt is ONLY used to assemble the platform that moves up and down which the arbor plates rest on
- Two long pins (Approx 200mm x 20mm)
- These are used to support the platform. They go in the big holes down the side of the rails
- One allen head bolt
- This is used with the smaller nut to hold the bottle jack on the platform. It has a 5mm allen key head
- Two bolts with eyelets
- These are used on the two other holes where the bottle jack goes, the eyelets are what the springs hook onto
- Two springs
- Obviously, the springs hook onto the eyelets and the two bars in the top rail
That’s it, the bag of bolts and nuts looks really complex, it’s actually simple to work out though. I was methodically assembling it a bit at a time whilst I was working. Took me just over an hour.
Second, another thing I don’t like about the press. Is that the holes don’t appear to be level. It’s possible this is the way I assembled it, but given that everything is square, I suspect it’s not lined up. Just something to be careful of when pressing parts.
Lastly, the holes aren’t really at the best working heights. You will most likely need to drill your own holes, or increase the working height using a pair of wooden chocks. The only decent working height is at the maximum reach of the jack itself, so you will need to increase this height before you can do any work with it.
What tools do you need to assemble the 12 Tonne Hydraulic Press?
I used a 5mm Allen Key, a 19mm Spanner and an Impact Gun with 19mm Socket. I did this to speed up time, but Impact Sockets are thicker. Realistically all you need to assemble this is an allen key, and a couple of adjustable spanners, or 19mm socket + ratchet with a spanner. It’s relatively easy to assemble
Would I recommend it? – Yes, for sure. It will do the job just fine and for the price you can’t really complain, £100 is not even 2 hours labour at a garage. You would be surprised how many times you use things once you own them. I know for me having access to a bearing press will be useful. You also need to use a bearing press to replace the clutch release bearing for gearboxes. So it’s a handy tool to have in the garage which saves you money
I made a very quick and brief video on Youtube about the press I purchased and my thoughts about the product.