As part of my home network upgrade, and related to migrating to a different broadband provider. I decided to run and terminate my own Cat6a shielded network cable around the house, as this has been something I’ve been wanting to do for boosting speeds in the household.
I purchased a bulk reel from Cablemonkey and some tools, then went about making my own cabling setup.
Disclaimer: This page contains affiliate links. Predominantly as an an eBay Partner Affiliate, Google Adsense and Amazon Affililate and as a member of other affiliate networks. If you choose to make a purchase after clicking a link, I earn from qualifying purchases and may receive a commission at no additional cost to you.
How fast does my Cable support?
I purchased a Cat6a network cable, because it’s shielded to reduce the interference, and I wanted to future proof my network so that it could support up to 10Gbps network speed. You could technically do this with lower spec like Cat5e as long as the runs are less than 45 metres or so, however I didn’t want the hassle of “cables that COULD” support it. I opted to go for a cable that is designed to support these rated speeds with the relevant terminations to match
I also don’t know if it can officially do the 10G-BaseT speeds, since the only official way of testing it. Will be to buy a certified cable verifier from a reputable vendor online like Fluke, and most of these pieces of equipment run between £700 and £3000, which I cannot justify spending when I can simply buy a pre-made cable and just run it this way if I wanted to guarantee it.
As a note a cable “tester” is not the same as a “verifier”, they do two different things. A cable tester just tests the connections to make sure they’re terminated properly. A verifier runs signals down and verifies they can support the speeds for those signals and a lot more fancier rubbish too
Does my Cat6a run at 10G-BaseT?
Unfortunately at the moment no. My current hardware in my household for the faster connections runs through a 1 Gigabit network switch from Netgear. The LED lights on the switch both lit up instantly to signify a 1 Gigabit connection. My home computer also supports 1 Gigabit and these lights both came up too (previosly 100Mb on home PC).
Which network termination method, T568A or T568B?
Firstly I decided which network termination method I was going to use. it’s more down to preference, but I prefer to go by the T568B standards for wiring up network cables. So this is the method I chose. After this, I went about making my cables and connectors up after cutting them to length and getting my supplies

If you’re stuck and unable to do this – you could always buy your own premade cable
How I crimped my cable
Whilst not fully seen, I went about measuring my network cable around my house. Using a tape measure to determine the approximate length and route I was going to take (it was about 45ft). I measured about 55ft of cabling, for the inevitable miscalculation, or mistakes and then chopped the wire. Remember if you’re using a boot to put the boot on now before you forget!
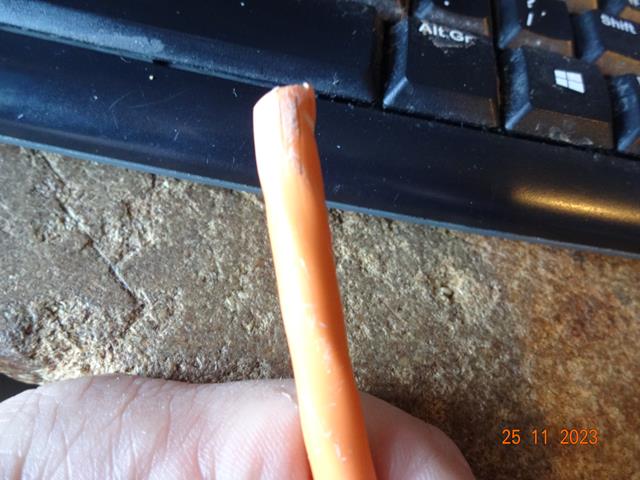
After cutting the wire up to the length I wanted. I needed to strip the outer jacket off the Cat6a network cable. I did this using the Connectix cable stripper that I purchased from Cablemonkey with my order. First time using it, so thought I may aswell to see what it’s like. To be fair, it was really easy and simple to use, which is the way they should be. It seems to automatically gauge the wire without damaging the data wires underneath because of the shape of the hole. A couple of turns, a sharp blade cut open the sheath and I removed it.

After removing the sheath, I went about finding the rip cord and removing it. This is basically just used for cutting open the shealth and trimming wires further down either to prevent any potential damage to the cable. Or just if you’re paranoid. Peeled away and removed. This is different to the drain wire. The rip card, is simply a string. The drain wire is an actual metal wire, that’s central between all of the shielded cables as it acts as a drain to get rid of interference because it’s connected to all the wires through their shield internally.

Rip cord removed. Time to seperate the wires and their conductor. As you can see in this picture, the drain wire is central to the other shields and wires

After opening up the wires, I removed the insulation on the shielded Cat6a cables. Just peeled them backwards, and then snipped away with a pair of wire cutters to remove it.

I pulled back on the drain wire and held it seperately against the jacket so it wouldn’t interfere with the work that I was doing.

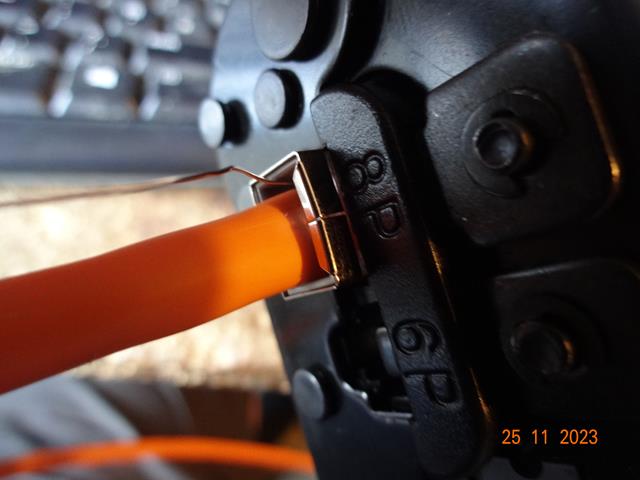
After seperating the drain wire, I then straightened out the wires according to T568B standard of network cables. Fitted the easy guide boot on and then put the cables into the connector. I didn’t get a picture of this step, but one of the recommendations for crimping Cat6a shielded cables is to make the cable “oval” shaped, that you plan on inserting the connector, as it makes it easier to fit. I have to agree. Afterwards I checked to make sure I had them all fitted correctly

Once I was happy with the cabling, I crimped the connector with a Ratchet crimper that I purchased alongside my order. This crimper is designed to hold the 8mm cabling, and the larger Cat6a connectors that are shielded
After the wire was crimped, I inspected again to make sure no issues with the quality of the crimp

I then wrapped the drain wire around the cable to get rid of the drain wire
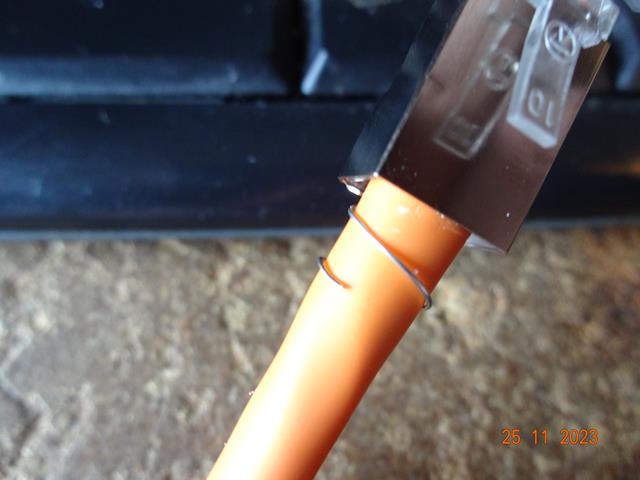
Using the foil shield tape supplied with the kit, I wrapped it around the wire

This is the cable with the foil shield tape wrapped around the drain wire. It helps to reduce noise, and also helps to provide the drain to ground. In better connectors you normally just crimp a boot around this, but this kit doesn’t come with those

The final step after this was to simply slide the boot over the cable

If you don’t fancy doing this, consider buying a pre-made cable if this is easier
Disclaimer: This page contains affiliate links. If you choose to make a purchase after clicking a link, I may receive a commission at no additional cost to you. Thank you for your support!