I needed to do a wheel bearing replacement on my Audi A3. I’ve been having problems with my car and had to take it off the road for repairs. There’s actually a bigger issue relating to this, but for legal reason I won’t disclose this, so thought I would write about wheel bearing replacement on my Audi A3 to give others hints and ideas what to do if they’re stuck.
Disclaimer: This page contains affiliate links. Predominantly as an an eBay Partner Affiliate, Google Adsense and Amazon Affililate and as a member of other affiliate networks. If you choose to make a purchase after clicking a link, I earn from qualifying purchases and may receive a commission at no additional cost to you.
The wheel bearing was a pain to remove on my Audi A3, mainly because 1 bolt was causing me so many problems to change over the wheel bearing on my Audi A3. I actually did both sides, as it’s the proverbial law that when one side goes being an Axle part, the other side is close to follow.
Tools I used for my Audi A3 wheel bearing replacement
Please note, not all of the below tools are required, I am just highlighting them because I had problems, just to give an idea of tools used. Most of the tools you need for an Audi A3 wheel bearing replacement should generally be in common toolkits that you buy
- Vehicle Jack available on Amazon or eBay
- Axle Stands (x2) available on Amazon or eBay
- XZN Triple Square Socket (M12 to M18) available on Amazon or eBay
- Assorted sockets (16mm – 21mm) available on Amazon or eBay – you need 24mm for Driveshaft
- Assorted spanners (16mm – 24mm) available on Amazon or eBay
- 5.5mm Allen Key available on Amazon or eBay
- Hammer
- Chisel and Punch set available on Amazon or eBay
- Impact Driver available on Amazon or eBay
- Carbide Burr Tool available on Amazon or eBay
- Drill / Drill Bits
- Wire Brushes available on Amazon or eBay
- Penetrating Fluid / Oil available on Amazon or eBay
- Blowtorch available on Amazon or eBay
What parts are needed to change the wheel bearings on Audi A3
My preference on parts is Febi Blistein, I like using Carpartsinmotion (on eBay) as I like these items. The wheel bearing kits come with the bearings, and the replacement bolts (for driveshaft and mounting to the hub). There is a choice of kits, I opted for the 2 bearing kit so I could do both at the same time. You will need to establish which wheel bearing your car has by physically looking or verifying elsewhere
Like most of my articles, these are affiliate links. They’re from the same suppliers I used for my parts, so I’m confident with recommending them. You’re under no obligation to use these links, I’m just paid a commission if you do and they help me out
- Wheel Bearings you can get both 3 hole and 4 hole versions on eBay
- Dust Shield covers (optional) (passenger, driver) mine were gone (I replaced mine at same time)
- Screws for dust shield (optional) (above, mine were rotted, I used an impact driver to get old screws out)
- Tie Rod ends (optional) (passenger side, drivers side) (factory is a 5.5mm allen key FYI)
- Wheel Nuts (just here if needed) (unrelated I needed new bolts due to other issues)
- Brake disc retaining screws (optional)


What wheel bearing type do I need?
Best to have a look at the car and be sure, but I believe 280mm and bigger normally uses the 4 hole type, the 3 hole type is for brake discs smaller than this size
How to replace your wheel bearings in Audi A3 8PA Sportback
Not really a guide, as I had too many problems, but in a real world, if everything goes to plan. This is how you change them as a quick bit of help if needed. Please note, this is just a quick bit of information as a point of reference if required
- Loosen the driveshaft bolts + wheel nuts with vehicle on ground (don’t remove, just free them up)
- Jack up car both sides, and place on Axle stands
- Remove wheels on car
- Remove driveshaft bolt
- Remove brake caliper carrier assembly (21mm nuts) – secure against suspension
- Remove nuts holding on ball joint (16mm nuts)
- Lower ball joint, pulling hub away from bearing
- Extract driveshaft from wheel bearing hub
- Remove wheel bearing bolts (M12 Splines x4)
- Remove old wheel bearing
- Clean surface and regrease new housing (don’t interfere with the wheel speed sensor, or you’ll need a new one)
- Refit new wheel bearing
- Refit wheel bearing bolts, tighten to 70Nm + 90 degrees
- Refit driveshaft
- Refit brake caliper carrier and assembly
- Refit ball joint
- Tighten ball joint nuts to 75Nm
- Lock off brake disc with screwdriver, torque driveshaft bolt to 200Nm
- Refit wheel tyres and wheel nuts
- Lower car, tighten wheel nuts to 120Nm
- Tighten driveshaft bolt another 180 degrees in Angle
- Test drive car, retorque wheel nuts after 50 miles
What the torque settings are for the Audi A3 when changing wheel bearings?
If needed I’ve listed the common ones below straight from the quick reference book. I think the tie rod ones are wrong and think they should be around the same as the ball joints
- Driveshaft bolt (there are 3 types) …. NOTES BELOW
- 12 Point (ribbed head) – 70Nm + 90 degrees
- 12 Point (smooth head) – 200Nm + 180 degrees (black variant), 200Nm + 90 degress (silver variant)
- 6 Point – 200Nm + 180 degrees
- Wheel Nuts
- 120Nm (and retorque them after around 50 miles)
- Suspension bolt (wheel bearing to strut)
- 70Nm + 90 degrees
- Ball Joint
- 75Nm
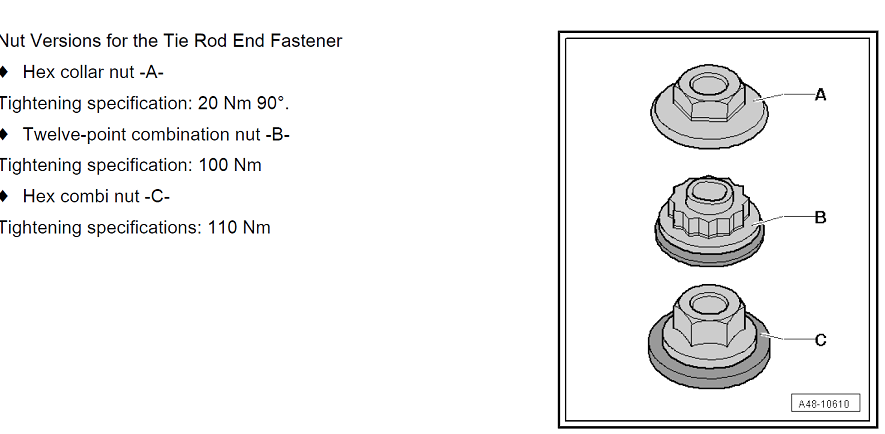
- Tie Rod
- 20Nm + 90 degrees (this is too loose, I think the actual value is meant to be 120Nm)
- Suggest fastening until it feels tight and needs force to turn, then angle tighten by 90 degrees. I think realistically it’s around 75-80Nm). I found this link which points to an eRwin article, and the quick reference book is probably referring to Nut A, rather than nut C. Hence why it keeps quoting 20Nm, 120Nm sounds more realistic as it’s connected to Axle and your steering rack
- 20Nm + 90 degrees (this is too loose, I think the actual value is meant to be 120Nm)
- Wheel bearing housing
- 70Nm + 90 degrees
- Wheel speed sensor
- 8Nm (just finger tighten)
- Dust Shield
- 12Nm (just finger tighten)
What is a smooth or ribbed head driveshaft bolt?
Easier with pictures, this only applies to the 12 point sockets.
If the rear of your bolt looks like A and has little ridges it’s ribbed, if it’s smooth and flat without ridges it’s B

Why the different torque values on the driveshaft bolts?
This is purely down to the head design, they bolt clamp the same, it’s just the ribbed edges allow better contact with the driveshaft, so you don’t have to tighten them as much. It applies the same force though.
How do you tighten the wheel bearing in the air?
A few methods, jam something on the brakes, or get someone to sit in and hold their foot on the break. Another approach is wedge a screwdriver into the brake disc if it’s vented (make sure it’s a chunky one), and then lock it off against the brake caliper that will stop the disc turning and allow you to apply enough force to do the initial torque. As a side note, on the drivers side the screwdriver goes above the caliper. On the passenger side it goes underneath it (as the wheels turn towards the rear of the car). Once the nut is tightened simply use the screwdriver to rotate the brake disc backwards and extract it.
How long did it take to change the wheel bearings?
The actual wearing bearings I had fitted within an hour, it was the removal that took the longest, because one side was OK. One side had a broken bolt and it was an absolute pain for me to get out. Although typically in hindsight after doing the task it would have been easier had I known. I spent the rest of the time cleaning up the fitment fascias of the bearing, and screwholes with a drill and wire brush. So that the mounting points were nice and clean. I did also do the brake pads as they were getting low. I again went with Ferodo pads (FBD1641), their wear life is excellent not to mention their stopping power. I run Brembo brakes on my car and can’t fault them.


Tips for removing the bolts I had problems with
When I was going to remove the bolts, I had a couple of problems. One of them was the bolt in the suspension strut stripped and broken, so I couldn’t drop the wheel bearing housing out. This was my alternative approach to getting more access, one end broke, the other end stripped. Had I known what I knew now would have saved me so much time.
The bolt that pinches the wheel bearing housing around the shock absorber strut is threaded, however the inner tube it feeds through isn’t threaded. So you can basically do one of two things. Just get a large hammer, and whack it hard to dislodge it until it comes out. If it’s stuck, you can get a 10mm drill bit and drill out the internals. This will allow you to fish out the remainders of the bolt with a screwdriver and chisel.
I also removed the tie rod, it was being a pain for the job I was doing and wouldn’t come off, so I burnted it off and just ordered a new one. The new tie rods are like £15 each, and way less hassle just fitting new stuff. As a note the centre pin on factory tie rods is 5.5mm in size. I didn’t have one, which is why I burned it off


Another problem I encountered is the M12 Bolt in the wheel bearing housing had stripped teeth, and a broken extractor inside it almost impossible to drill. If the heads strip, I wouldn’t bother using extractor. These personally never worked for me and I broke it. There’s two options I would recommend here
You can cut a small notch in one end of the bolt face (burring bit, angle grinder), then simply use a hammer and chisel and hit the surface to loosen it and rotate it out. This is probably the easiest approach. You can see the notch in the picture below
Another approach, is similar to the suspension bolt. The only part of the bolt which holds threads is the wheel bearing itself. I used a drill/burring bit then ground away at the bearing to access the bolt (initially I was going to drill it out). Basically if you get this problem, you can drill away at the bearing until there’s no remnants of the bolt left (make sure you don’t drill the housing that the bearing attaches to) just the bearing itself, or you’ll need a new bearing housing.
Once the thread holes are gone so it’s no longer in contact with the bearing housing, you can simply whack out the bearing with a punch and hammer. You have just enough room to hit the bolt through the hub holes of the bearing from the other end. Like the suspension bolt, there’s no physical threads inside the actual bearing housing. Only the bearing itself, it’s basically just clamped onto the hub through age and threads. If you want to verify this simply look inside the holes where the other bolts came out from


How long did my factory bearing last?
The mileage I changed my bearings is below (156,628). I’m assuming this is OEM bearing, because everything on my car looks like it has been untouched. So wouldn’t be surprised as I think it had a factory stamp on too. This goes to show the quality of the parts, so OEM bearings are good for at least 100,000 miles I’d say. The bearing could probably go for longer, but I think when I removed the driveshaft bolt and driveshaft when doing my turbo. I doubt I tightened it up fully to OEM torque specs (as I didn’t renew the bolt) or have the right size socket for it, so it probably explained why the drivers side failed first. Still 150k miles on a factory part is good.

Possible problems you may encounter after replacing Front Wheel Bearings
You may get an issue come up with ABS where the light stays on. This is probably because you interefered with the wheel speed sensor, like I did. Either unplugging it, or disconnecting. If you get an error, normally reconnecting it and taking the car for a quick drive should fix it. If not you can order a replacement wheel speed sensor on eBay if required, they’re about £10 each
Other notes, thanks and affiliates
- If you end up replacing the tie rod or any geometry components, you will need to have the vehicle taken to a garage for the tracking to be corrected on your vehicle. Mine was out slightly which I had fixed today
- Highly recommend drill powered wire brushes, and burring bits. Especially carbide ones, they’re great for chomping through metal that’s broken bolts. VAG bolts are surprisingly tough. I’ve since ordered a Milwaukee Die Grinder and bits to add to my collection. Not to mention about £200 of removal bolts and tools for my collection to save me getting some in future.
Disclaimer: This page contains affiliate links. If you choose to make a purchase after clicking a link, I may receive a commission at no additional cost to you. Thank you for your support!
Original article : https://www.andrewhope.co.uk/Blog/audi-a3-wheel-bearing-replacement.

Courtesy of https://www.andrewhope.co.uk
