This is just documenting the Electronics workbench that I’m building for using in my household. It will be based in my bedroom, so will be a shared room. The room itself is only around 12ft x 8ft in terms of dimensions, so not very big for storage
I’m a person who very much likes tinkering and experimenting, and learning myself doing things myself at home. So this build suits me, I hate relying on other people, and want the capacity to fabricate and invent things at home when I want them. Projects wise, I’m mainly interested in Robotics and Medical Support. However I’d prefer to not focus in one sector, since I like drones, and anything electronic.
Currently the room is occupied with a Kingsize bed, so I plan on removing this so that I can move my computer equipment to another part of the room where I plan on installing the workbench, and downsizing to a single bed. I’ve never been bothered about bedspace, more leg space.
This build is going to change over time, so I’m going to keep adding to this post as I work on it. I’m slowly buying parts over time, and I’ll be placing affiliate links where possible in this article for the products
Tools that I have to date
I’m slowly adding to my collection and thus far don’t have many. I’m excluding smaller components like Multimeters and Amp Clamps and testers, and just listing the bigger things
- Quick 861DW Hot Air Station
- 3D Printer
- 300w Bench Top PSU (Longwei) – 30v/10A
- Hakko FX-951 Soldering Station
Next on the list
- Rigol Oscilloscope, probably something like 1054Z Plus, or something that supports MSO
I have a long list of things I want so simply buying them over time when I get the moolah
Storage Drawers
The storage drawers that I use in my electronics workbench build, are made by Mac Allister, and sold by B&Q or Screwfix in the UK. These storage drawers are a B&Q brand, so you probably won’t find them anywhere else. The drawers are double stacked (1 large / 1 small) and joined together as one complete unit (giving me 70 small, 3 medium and 1 large drawer) per unit or cabinet
Just for info, the total cost of all these storage drawers was (£303.96). It would have been £276, but I was having difficulty sourcing the smaller ones that I needed for this build (and some larger ones, mainly because they were all broken or had parts stolen on them). This is one of the only downsides that I had (also the spot welds are poop), so it can be broken easy, but can be pop riveted back together but for the price you can’t complain. Hard Plastic Drawers and thin-metal box rather than plastic. £25 and £21 each depending on which one you buy from B&Q (or £27.99 and £37.99 from Screwfix) 🙁
One of the challenges I had with these drawers was that I kept finding ones with broken drawers. I plan on making these via injection moulding (shop link to follow) as a Business, and also making some parts drawer dividers via injection moulding (shop link to follow again) as a Business because these aren’t sold with the bigger kits, only the smaller ones.
I like the drawers that I purchased, so once I purchased a couple I had a mental image in my head of how I wanted it to look. Now, the image I wanted in my head for my Electronics workbench and the storage drawers, was that I wanted a LOT of space. Basically I plan on having my workbench with storage above it, and then bookshelf as reference material above that. The drawers are then to be securely mounted to the wall so that they don’t come off regardless. I’m now at the point where in terms of the storage, I’m happy with how much I have (for now), and that I can add more as later as needed with different sized drawers or bins
In summary, the total amount of space across all 12 of the cabinets that I purchased (6 tall / 6 small), is the following:
- 420 small bins
- 18 medium sized bins
- 6 large bins
For the electronics workbench, I’ll actually only be using 5 drawers (double-stacked) in each section, because I plan on using 1 for my Amateur Radio station section that I’m working on (As I’m going for a Full Amateur Radio license). I wanted to have a dedicated area for storage of all my coaxial and satellite connectors rather than switch between them.
If you’d like to read how I double stacked the drawers together, you can read this article here.
Reference Material
As the room I’m using is my bedroom, I have to make use of small spaces. I used to be a bookworm, with the rise of the internet, I found it easier to simply search it. I’m trying to get back to my habits. I’m going to have maybe 3 or 4 different areas in my room. Although each will be focussed towards the section I’m working in. At my bed, it’s just general or language books. Around my Radio/Computer/Workbench will be more reference material so I can go back on them..
I’ll also be buying some SMD “Sample” books, for tiny parts. These are electronics components, but in a book format, so thought I’d mention them here. They’re good for basic repairs, and little components that you rarely use, so can be stored up high.
What does it look like in my head how I want it
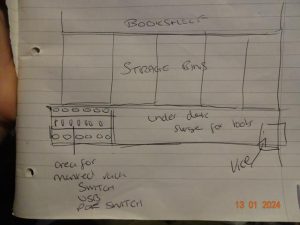
I thought I’d draw a picture of the mental image I had in my had of how I want things to look so others can see end goal that I’m aiming for. I did this sketch below quickly to show my room plan. The left picture is a top down view, and the right picture is sort of how I want the bench to look. There will be around 10″ to 1ft of space below the storage cabinets for tools, and the bench will be about 2ft deep which will be enough for most things
The electronic workbench I plan on having a small section of it, with plug in power sources for Networking, POE and USB. I’ll buy some cheap rackmount rails and nuts and just screw them into the wood, then they’re permanent fixtures. There is 31″ of space below the desk for drawers, and other storage, but predominantly all the tools I want will be mounted under it. I’ll also have my toolbox to the left of the desk to access my common tools near the TV


Building the Electronic Workbench
The only thought I wanted in my head was that I wanted my Electronics Workbench to about the same height as my current computer desk, and the same thickness. My existing computer desk is really big and strong (18mm thick and about 24″ deep), and over the years, it’s served me well. I wanted to replicate this to my workbench, as where I’m placing the workbench, I want to have my computer desk in the corner too. So that it flows like one continuous bench. I might make the work bench smaller in depth, but at the moment I’m working on 2ft deep since some electronics components are very deep and take up shelf space.
There will be about 10″ of depth between the bench and the shelves so that I have room for some big equipment. I’m also thinking of putting a POE and Network switch and APU there too. Or some form of rackmount USB hub. Not sure on this one yet though. I might have that put to one side of the bench. The idea is sorta fluctuating in my head as I type this article. I might make all the rack mount items in the same area under the bench so that I have one spot for everything
Update : 21/01 – I’ve been to B&Q today and purchased the materials (£102 lighter) that I need to assemble and mount my workbench, I’ll probably start construction of on the weekend next week (27/01). B&Q couldn’t cut the parts as small as I wanted, so I’ll be doing this with my circular saw instead. Only a few small pieces, then focus on mounting the desk and assembling it. Pics to follow
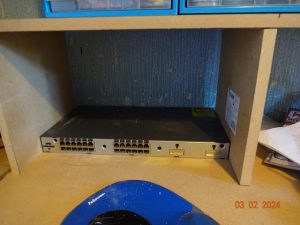
Updated : 03/02 – The first main stage of the desk is complete. I’ve decided to use the “Bookshelf” as storage shelves instead, I’m not a joiner, but the desk is designed how I want. The underdesk storage on the right is where all my tools are kept, the left hand side of the desk is the rackmount area, which will store network switch, poe switch and usb hub alongside networking items. The toolbox is on the far left. Next I’ll be laying down power, and ESD matting. This is how it looks currently


